Craftsman Perspective
Arts and Crafts Questions
Frequently Asked Questions
Interior FAQ
General FAQs
Is My House A&C Style?
Q: We have a brick bungalow built in 1931 that we were led to believe was an A&C house. Were there any A&C-style houses built after 1920?
Is your house Arts and Crafts? Technically, no. Is it of Arts and Crafts influence? Definitely, yes. The Bungalow is a style that transcended the A&C Movement. It got its start here in America during the A&C Period, but its simplicity and practicality made it quite popular through the 1920's and '30s. In the 1940's the Bungalow was replaced with a modern Frank Lloyd Wright version -- the Ranch style house. The Bungalow was one of the most popular styles for the many companies that specialized in "kit" or mail-order houses (including Sears Robuck, Alladin and others) during the 1920's. Keep in mind that the real rise of America's middle class happened during the Arts and Crafts period (1895-1920), and expanded exponentially after World War I. The Bungalow was a popular choice for the millions of new middle class homeowners -- extending into the 1930's. But its roots are most definitely in the Arts and Crafts Period, even if the interior details may have been modified to suit the tastes of the time.
What is a Kit House?
Q: What is a kit house? And are they any good?
In case you're not familiar with kit homes, here's a little background. Beginning in the late-teens, the demand for affordable housing exploded. To serve the growing demand for single family suburban homes, national companies such as Sears and Alladin Homes as well as many local builders began to market their own kit homes to a population hungry for a piece of the American dream.
Basically, you'd order a kit home book from a vendor, say Sears, pick a style you liked, added extras like interior trim, plumbing and accessories, total the bill and ordered it. A truck would deliver all of the lumber, brick, shingles, etc. to your empty lot and you'd build the house (or have someone build it for you). Kit houses were inexpensive and very popular and many companies sprang up to serve the marketplace. The trend lasted for about 10 years, when a great many homes were built across the U.S., which is why you can find identical styles in so many parts of the country. Lots of bungalows, Craftsman colonials and revival styles. The kit home market survived into the 1950's with another influx in demand after WWII. Modern sub-divisions use the same idea with a builder offering several customizable styles within a plan.
Blueprints
Q: I am building my own bungalow and want to incorporate elements from Frank Lloyd Wright and Greene & Greene. Where can I find full-sized drawings?
Sue Steeneken of Felhandler, Steeneken and Wilk, Architects, says that, generally, the only way to get copies of the original architectural drawings is in reduced form in a monograph on Greene & Greene. These could then be photographically enlarged in order to use them. The originals are mostly in institutional hands such as university libraries.
As for Lloyd Wright drawings, apart from those in the hands of design museum collections (Cooper Hewitt in NYC, for example), his architectural studios at Taliesin in Wisconsin and Taliesin West in Scottsdale, AZ has an abundance. I'm not sure if copies are available, but the studio gift shops have a plethora of Wright drawings in poster size as well as illustrated books. No actual blueprints, however. Look up Taliesin on the Web for more info and phone numbers.
Stickley Furniture Plans
Q: I'm interested in building my own furniture but need detailed drawings, preferrably of pieces found in the current Stickley furniture catalog.
You're in luck! Blueprint books on original Stickley furniture abound. Try these books found by doing a search for Stickley furniture at www.amazon.com Making Authentic Craftsman Furniture : Instructions and Plans for 62 Projects by Gustav Stickley(Editor) (Published in 1986) Arts and Crafts Woodworking Projects : 11 New Designs in the Stickley Tradition by Robert E. Belke (Published in 1998) Early L. & J.G. Stickley Furniture : From Onondaga Shops to Handcraft by L. Stickley, et al (Published in 1992)
Interior Decorating
Q: Was stenciling on walls, floors, beams and furniture a common practice in homes during the Arts and Crafts period?
A: Most definitely! Although I have found no references regarding floor or beam stenciling, there were many articles and "How-Tos" directly relating to decorating your Craftsman home or bungalow by hand, whether it be through the use of stencils on walls or furniture, hand-embroidered table cloths, curtains and pillows, or handmade metal accessories.
There are several considerations, however. Keep in mind that the whole philosophy revolved around the themes of nature, simplicity and handicraft. Stencils were the A&C response to the heavy, ornate, mass-produced wallpapers found in Victorian homes. Stencils should be beautiful in their simplicity and its colors should be based on tones and hues found in nature -- not necessarily muted, but they should be soothing to look at and not call attention to themselves. And, just as home decor was meant to be uncomplicated and uncluttered, do not go crazy with your stenciling. A simple repeated pattern using a palette of no more than 4 or 5 colors should suffice. And it is my own recommendation not to stencil everything in sight. Stenciling your walls and beams and furniture and floors will be assaulting to the eye, which is exactly the opposite of what hand-stenciling was supposed to achieve. Pick two at most: one near the ceiling and one nearer the floor (walls/floor, beams/floor, walls/furniture, beams/furniture).
Ideas: iris, roses, waterlilies, ginko leaves, oak leaves and acorns, geometrics using one or two colors. Sources: children's books from 1900-1930, original designs by Rennie Macintosh, early geometric designs by Frank Lloyd Wright, various design elements from period accessories (Harvey Ellis, Rookwood pottery, Grueby tile). For more information, check out these books: Craftsman Homes by Gustav Stickley, (1915). Also, The Beautiful Necessity: Decorating with Arts & Crafts by Bruce Smith and Yoshiko Yamamoto, (1996).
As for painting your beams, I have seen it done at the Fechin Inn in Taos, NM. However, I see this as being a Southwestern style and not an Arts and Crafts style. (I do recommend a trip to the Fechin estate -- the Russian artist's 1929 Mission home is worth seeing).
Interior Color
Q: What colors were popular in the Arts and Crafts era?
A: The Arts and Crafts color scheme contained harmonious tones that reflect the subtlety of nature. Stay away from bright primary colors and pastels. Dusty hues are fine, as are muted colors. My own preference is to use vegetables and stone as my color sources: mustard, zucchini, squash, eggplant, as well as limestone, sandstone, feldspar and the various blue-grays and browns of river rock. Go on a little nature hunt and collect things with colors you like, choose your palette and take them to the paint store and ask them to make paint of the same color (they create colors from fabric swatches and such, so why not rocks and plants??)
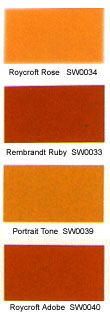
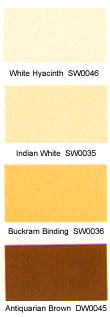
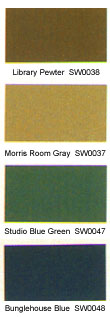
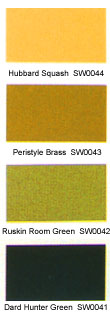
The excitement of adding color to your home may not allow for an extended search for your own personal color palette. With that in mind, Pittsburgh Paints has earthy colors including a summer squash and Mission beige. And I've heard that Sherwin-Williams has a palette of Arts & Crafts colors, created in conjunction with Roycroft Associates in 1991, and based on the hues used by Roycroft and others during the early 1900's. By the way, did you know that Hunter green (one of today's standard colors) was originally created by Dard Hunter, an important Arts and Crafts designer?
It is impossible to capture paint colors on-screen so they will appear accurate on all monitors, but here is a sample of Sherwin-Williams paint based on original A&C hues developed by Roycroft Associates.


Updating an Old House with Paint and Stain
Q: I would like to do as much as I can to use the Arts and Crafts idea in my new old house. Presently it is wood shingle, granite and stucco, but it has all been painted white! There are pocket doors in the main rooms. However, all are painted a dull light green. EVERYTHING is painted this dull green except for the boxed beams, which are cherry color. Can you give me any expert advice about rennovation of this house?
A: First, let's focus on the exterior. The range of colors you can use is tremendous. With stucco and shingle, plus trim, you can incorporate three colors into the exterior very nicely. My personal taste would be to choose a light color for the stucco -- taupe, coffee au lait, or a light reddish tan -- and a meduim tone for the shingles -- such as rust or dusty blue -- the trim could be white or a darker variation of the stucco or shingles.
As for the inside, First thing I'd do is strip the pocket doors (they are on rollers so you can take them out and strip them flat, which should make it very easy using Strip-Ez and a heat gun ($20 at your hardware chain). Strip the doors and frames and other painted woodwork in the downstairs. If you sand the floors before you stain the woodwork, you will reduce the need to remove the dust twice from the woodwork. Sanding the the floors should make them like new, so don't worry if they look less than perfect to start with. You should be able to find a floor sander at a hardware rental shop. Stain and finish the floors with several coats of polyurethane. Finally, stain the pocket doors and other woodwork a cherry color to match the beams.
Just by refinishing the wood, you will make your home cosy, beautiful and authentic. It's the first thing people notice and comment on. Upstairs, woodwork was usually of a lesser quality and was most often painted. So it's fine to paint it rather than strip it. Use the colors shown in the "advice" section of Craftsman Perspective for some ideas on interior color choices.
Kitchen Remodeling
Q: I want to remodel my kitchen. How can I recreate a period kitchen? Are there companies that offer Craftsman-style cabinets and where do I start?
A: Remodeling your kitchen may be the most challenging part of renovating your Arts & Craft home. For one, there is no obvious style as there is with the living room and dining room. True period kitchens were, to be honest, ugly and utilitarian. Typical kitchens were extremely small and the focus was on cleanliness and efficiency. Little thought was given to style. White walls, tile, sinks and appliances showed dirt and crumbs easily so they could be cleaned up before they attracted germs and vermin. (This is one reason why freestanding sinks were used up until the 1930's).
Few people would enjoy living with a period kitchen of this sort. Luckily, there are several manufacturers who offer kitchens with a Craftsman appearance similar to Arts & Craft furniture. There are also companies who offer modern appliances with an old-fashioned appearance. Below are a few books, magazines and manufacturers to help you get some remodeling ideas.
- "The Kitchen Plan Book" reprint of a 1917 book, includes 50 model kitchen plans submitted in a competition of 343 leading architects of the time. This book shows exactly how Arts and Crafts kitchens would have been -- it's up to you to interpret the designs for modern living. Read the book.
- "Period
Kitchens" by Judith Miller shows everything you
need to create a period kitchen (including Craftsman style) including
mixing old and new, surfaces, layouts, storage, paint, built-ins.
Available on Amazon.
- The Antique Hardware Store offers "the look of period pieces and the quality of modern construction" for kitchen appliances and accessories. So if you want modern appliances with that old-fashioned look, this is your source. Website: vandyke.com
- Elmira Stove Works offers modern stoves with period styling. Website: elmirastoveworks.com
- Crownpoint Cabinetry features Mission style. Website: crown-point.com
Affordable Arts and Crafts Styling
Q: How can I create the Arts and Crafts look affordably?
A: Some years ago, when I was completely enthralled with the style, having just discovered a passion for it myself, I would have gone on and on about how the investment you make in purchasing authentic, high-end Mission furniture would reward you with heirloom quality that would last a lifetime and therefore worth every penny. That rings true to a great extent, but I think that advice was hard to swallow for many people on a budget.
Here are some general suggestions to consider. (you may need to do some online browsing in the stores listed are no in your area)
The A&C look needn't be old, nor does it necessarily clash with contenporary furniture. The idea to follow is simply that the furniture should have clean, straight lines, and the focus should be on natural materials and colors. If you can't find the color naturally in your neck of the woods then it isn't right. Turquoise is good in Florida and New Mexico, but would be out of place in New England. The best colors tend to be earth tones would be the more common browns, greens, maize and tans (the color of corn, wheat, oats, livestock and the landscape) with some natural reds and light blues thrown in for accent. This goes for paint AND upholstery.
- Buy one highlight Mission furniture piece and build your collection around it. Just one important piece, such as a sofa, easy chair, or dining table, can convey the theme over and entire room.
- Affordable accessories will enhance the look without adding a huge cost. In addition to furniture, adding period lighting will tie the decor in with the house style. If there is a Target store in your area, look for Mission lamps in both Tiffany and mica styles for $50-$100. Buy two and you'll instantly add a cosy feeling (they have a website). Lowes and Home Depot (whichever are in your area) sell nice, affordable Mission/Craftsman lighting too, though you may have to browse their lighting catelog and special order it. Lighting makes an enormous difference in how you and other will perceive your house.
- A collection of ANYTHING adds interest and buying affordable pottery from the teens-30's will still give you the charm you're looking for. And finding pieces is fun. I recommend considering buying on ebay (www.ebay.com). You can start a McCoy pottery collection. One of America's original Art pottery companies, McCoy is still very affordable but prices are beginning to creep up as interest gains. You can still find many items (vases, planters, etc) in the $20-$50 range. And only a purist would know that affordable McCoy dates from the 1930-40's. Along with McCoy, consider Hull and Weller pottery. And, if you can find it, Van Briggle (a Colo Springs pottery). Forget Roseville as the popularity is so high and prices over-inflated that you'll quickly spend all your money.
Exterior Color
Q: We need to repaint our 1917 Craftsman home and would like to use a color that is typical of the original colors from that period. What colors were used for exteriors?
A: In this instance, the house in question is brick, which has been painted white, and wood shingle, which was painted green. This presents a special problem because without costly renovations to remove the paint from the brick and shingle, it will be impossible to bring the exterior back to its original state. However, one of the nice things about the true idealism of the A&C lifestyle is that it's okay to follow a different path so long as the purpose of the trip is the same. In other words, don't worry so much about the exactness of your color choices; so long as you follow the Craftsman themes of simplicity and harmony with nature you'll capture the spirit of the movement and have a beautiful home as well.
That said, here is some general information concerning Craftsman and bungalow exteriors. I quote from an August 1916 article in Craftsman Homes entitled "More Craftsman Bungalows for Country and Suburban Home-Builders: "The question of the exterior color scheme will naturally be an important one and will depend on the nature of the landscape or neighboring houses and the owner's taste...." So much for being given a tidy list of paints to buy!
Having seen many pictures from the period, my observations are that natural is the way to go with wood. Clapboard walls were usually painted in earthy tones -- browns, red-browns, greens, soft blues and grays (think of slate, limestone and grays with hints of color). Cedar shingles were nearly always stained, not painted. As you cannot stain previously-painted shingles, I suggest using the same palette used for clapboard. There should be some contrast between the wood and brick so if the brick is light choose a darker hue for the wood. Trim should add a third color that compliments both the brick and the shingles/clapboard.
FYI: painted brick is not always bad. While not originally intended to be painted, brick color affords a huge range of options for shingles. I would stay away from colors that are too intense -- it makes EVERYTHING stand out too much. A neutral color that offers a little color and contrast should compliment the house nicely.
Landscaping
Q: What kinds of plants were popular with bungalows, and how would it have been landscaped?
A: While the plants of yesteryear were basically the same as today, there are a few things to keep in mind.
First and foremost, there are no hard and fast rules for landscaping other than it should compliment your home as your home compliments the landscape. An Arts and Crafts purist of the times would have insisted, however, that all of the trees, shrubs and plants be indigenous to the region (just as the house was to be built using local stone and wood). For that, you need to know what plants are not native to your part of the country and avoid them.
On the other hand, looking at the history of the time period, you see a strong interest in exotic plants (carried over from Victorian times when tropical palms and orchids adorned the interiors of large homes). Especially in California, Japanese shrubs and trees were popular, in addition to native palms and bougainvillea. I think the main A&C idea was to bring modern life closer to nature. It was not concerned as much with what kind of nature so long as it gave pleasure and was not out-of-keeping with the natural landscape of the region (as an ornamental Japanese maple would be if surrounded by stands of spruce pines.)
Still, there is one recurring detail that is a must for all homes in the Craftsman style: the pergola. Because of the importance of connecting the home and the landscape, a wooden pergola (or even a trellis for that matter) allowed the house to physically become a part of nature itself. A vine -- be it wisteria, clematis, climbing roses, ivy, morning glories, etc. -- was trained to grow up the pergola thus turning what was manmade into a vehicle for nature. If there are money or space constraints, consider stringing wires across the front of your porch and train morning glories or clematis to grow from the corner of your house up and across the front.
Here are a few other comments from a February 1916 Craftsman magazine article entitled "Making the bungalow externally attractive."
1: a shrub at the corners to soften sharp angles
2: a tree to give play of light
3: a variety of plants that make the bungalow attractive in winter as well as summer (i.e., shrubs that stay green all year-round in addition seasonal plants) such as azaleas, rhododendrons --or have colorful winter berries, such as viburnums and barberry.
When it comes to trees, consider how a mature tree will look near your house. A one story bungalow will probably be better complimented with a mid-sized tree rather than one that towers over it. Remember, proportion is an important part of creating a harmonious landscape.
Planting a Perennial Flower Garden
Q: What type of flowers should I plant to complement my 1920's bungalow?
A: Here is a planting list from the June 1925 issue of Better Homes and Gardens, which ran an article entitled "Landscape Design for an Attractive Semi-Bungalow."
- Bugloss
- Colorado Columbine
- Blue Wild Indigo
- Great Bellflower
- Mountain Larkspur
- Perennial Flax
- Spike Speedwell
- Iris, (Mme. Chereau)
- Washington Lupine
- Shasta Daisy
- Foxglove
- Madonna Lily
- Oriental Poppy
- Sneezewort
- Phlox (Miss. Lingard)
- Phlox (Frau Anton Buchner)
Garages
Q: We are purchasing a bungalow style home in Iowa and a garage is needed. We have already planned to match the pitch of the house roof, but were wondering if there were any details that were outstandingly used in a garage.
A: One of my favorite things to do is to take walks throughout my neighborhood admiring all of the bungalows and Craftsman homes. Many of the home have garages (either original with the house or built shortly thereafter) and I can honestly say that I don't notice them much. I believe that's the point. I came to that conclusion after passing a beautiful stone and wood shingle 1 1/2 story Craftsman home with a green tile roof and double dormers. It was so quaint and lovely. Unfortunately, my attention was mostly caught by the new double garage that had been built at the side of the house. It had the same pitch and green tile roof as the home, but (ugh) it was built of concrete block, painted cream, with a white aluminum door with each pane painted bright red. One has to wonder why.
Most homes I've seen have either a porte cochere (often trellised with wisteria or climbing roses), or a wood clapboard garage (sometimes it's stucco, which I love) that seems to blend with the landscape. In other words, they definitely don't stand out. Use your own judgment for taste, but keep in mind that unity and harmony with nature applies not only to the house but to surrounding buildings. Think of your garage as an extension of your house. My call is to either mirror the materials used in the house, or choose a siding in a color that allows the garage harmonize with the landscape.
Looking through Gustav Stickley's 1916 edition of Craftsman Homes, I've found no references to garages and very few photos. However, those that are pictured are constructed of the same materials as the house and use the same colors. No matter what you choose to do, however, you can easily add a touch of true Arts and Crafts flavor by trellising a flowering vine along the side of your garage.
Back to Top
 Craftsman Perspective is created and copyrighted by